Skip to Main Content

History 343: Law, Society and Justice in China

Digital Tools: Quick Links

Copyright-free Images

StoryMapJS

StoryMap JS Logo

Story Map JS is one of the tools created by and supported by Knight Labs at Northwestern University, in support of journalism.

The basic features of StoryMap JS are intuitive and easy to use. The quality of your StoryMap depends upon the research you've completed on your topic and the ways in which you've created a compelling story with a strong visual element.

Steps:

  1. Click the button to "Make a StoryMap" and log in with your Google account.
  2. Create your title slide. The title slide will show all points from your other slides.
  3. Add a slide for each place in your story. Setting the location is as easy as a text search for the name or address.
  4. For each slide, you can add a headline, explanatory text, and/or media, such as an image, video, or audio.
  5. You can change the visual style of your map with a few presets (located under "Options" at the top left of the screen).

Writing Captions

In the library and museum worlds, captions are viewed as interpretive acts. You are not just conveying information; you are attempting to provoke a response in your audience. When you have only a few words in which to do that, every word counts!  Be sure to keep your audience in mind, and to place materials in context. For each label, consider what the take-away or message is for the viewer. Use this to frame your writing.

Timeline JS

Timeline JS is an open-source tool that enables anyone to build visually rich, interactive timelines that can be embedded on websites. It is made up of images, text, and headlines using a Google spreadsheet.

Review these links to learn more about how to create a timeline in TimelineJS.

Getting Started & Adding Content

To get started in Timeline JS, follow these steps:

  • Sign in to your Google Drive account.
  • Copy the Google Spreadsheet Template from the Timeline JS website (click on the button "make a timeline" and then "get the Spreadsheet Template.")
  • Log in your Google Drive account and click on "use this template" to make a copy the template. 
  • Rename the template to reflect the title of your timeline by clicking on the existing title (Copy of TimelineJS Template)
  • Click the "Share" button in the upper right corner and change the access setting to "Anyone on the web can view"
  • When working in pairs or groups, have one person create the spreadsheet and invite the other in the Share settings.

Adding your content:

  • Edit the content of the template with the information that's going to appear in your timeline. Don't change anything in the top row column headings.
  • The first line is the title slide for your timeline.
  • Add the date, headline, text, image link, image credit, image caption, and image thumbnail (this will appear in the timeline below the slide).
  • Don't edit the column headers in the first row and don't leave any rows blank.
  • When you are done with your timeline, you can publish it.

Publishing Your Timeline

http://timeline.knightlab.com/#make

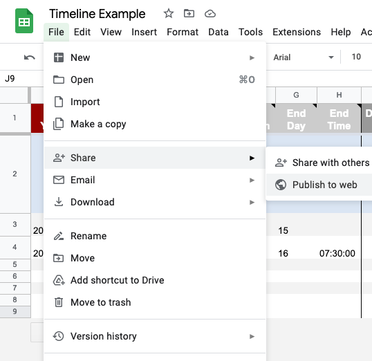
1. Under the File menu, select “Publish to the Web.”

In the next window, click the blue "publish" button. When asked, "Are you sure…?" click OK.

Close the 'Publish to the web' window. Copy the URL for your Timeline from the browser's address bar. It should look something like this: https://docs.google.com/spreadsheets/d/1xuY4upIooEeszZ_lCmeNx24eSFWe0rHe9ZdqH2xqVNk/edit#gid=0 

Disregard the URL that appears in the "publish to the web" window. It used to be used below, but changes to Google mean that you'll get an error if you use it now.

2. Preview the link to make sure there's nothing missing.

3. When you are done with your timeline, use the embed code to post it to Canvas.

Tips

  • Timeline JS does not let you upload an image. You must use a URL of an image with a file extension of jpg, jpeg, gif, or png.  
  • If you want to use more than one image on a timeline slide, create a collage using a free collage generator and save it as an image file. You will need to upload the image to hosted site to create a URL for the collage.
  • Anything you put in the display date column will override whatever you enter in the other date columns.
  • When you update a timeline, the changes are automatically made to the published timeline.
  • You can change the slide background color by entering a hexadecimal color. To find color codes, see this color chart.
  • To create a link within the text, specify the target in the <a href=" ">.Then add the text that should work as a link.Finally add an </a> tag to indicate where the link ends.